 I didn’t spend an inordinate amount of time working on the sashes for the outer edges; Lori Holt had posted that she was going to show a copy of her finished quilt so that gave me the heads up that I shouldn’t expect detailed instructions on “use this fabric on row 1, block 1”. So I just winged it! I had bought the kit available through Fat Quarter shop so I already had the fabric for the brown border around that. I had some other brown flowered fabric and couldn’t figure out for the life of me why I had it…but I realized this morning that’s the binding.
I have a few other things to quilt first – I’m quilting on the outer border of the stained glass quilt and then will bind it. I’d like to get caught up on the machine quilting blocks for the past 2 months first before I quilt this one.
Lori posted this morning that her long-arm quilter did stippling around each flower, then straight lined the sashing…so far so good. But she also quilting around the center of the flowers. I’m not that precise with my quilting experience so I don’t anticipate doing that last step. Check back in July and hopefully I’ll have this one done!

Next up – the king! I don’t know if you can tell from this picture or not, but it’s hanging from the upstairs bannister. This quilt is 120″ x 120″. Put another way, that’s 10 feet by 10 feet! This is why I own a Sweet Sixteen because there is no way I could have quilted this on my domestic machine. My sister had asked me last Thanksgiving to make a quilt for her for Christmas. I laughed, because there’s no way I can make a quilt in that time! I suggested she give me fabric for a Christmas present and I’d make her a birthday present from it. That worked out perfectly! I spent I think a good 3-4 months off and on making this quilt. The pattern is a twist on the disappearing 4-patch. I forget the exact name, bt the idea is you match up the 4 patches to create a larger square. You’ll see on the edges where I put in a variation on that for the fun of it. She knew this was in the works but the end product was a surprise to her. I wish I had taken photos of the quilting itself because I spent a lot of time coming up with how I wanted it to look.
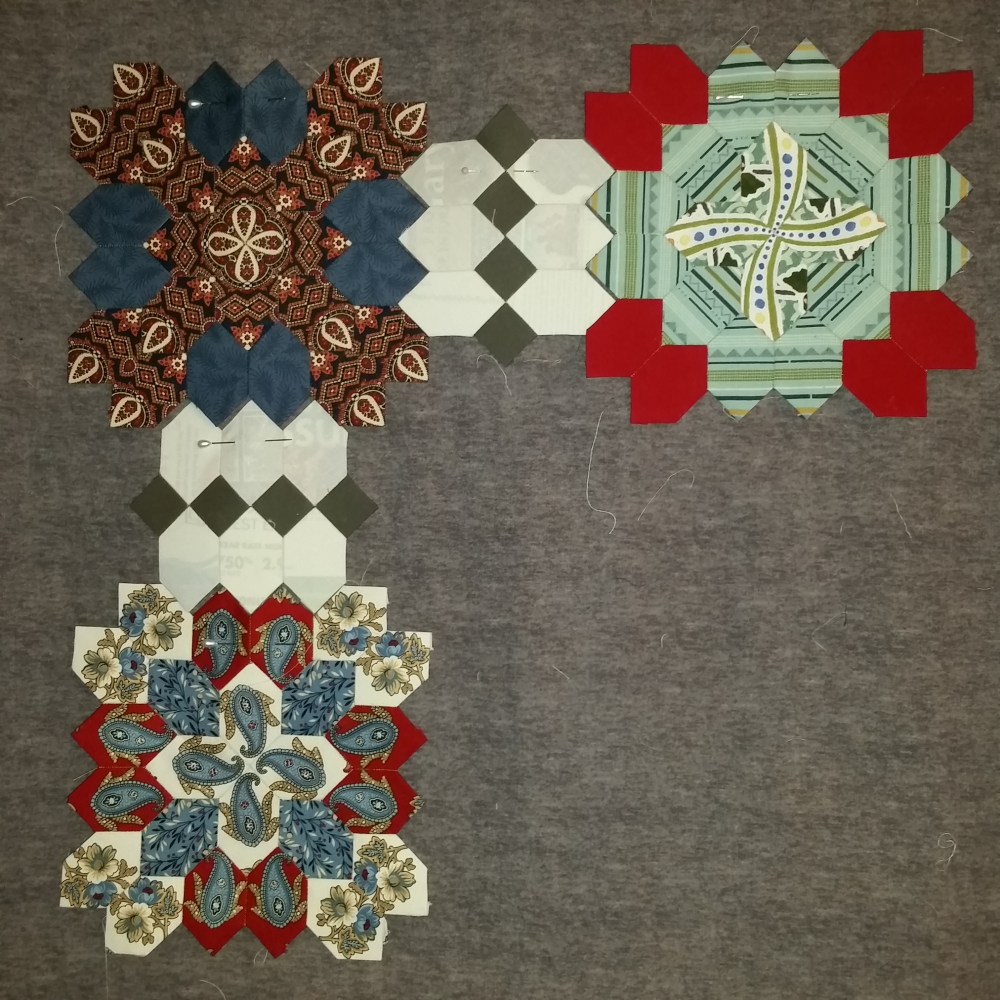
 I am officially starting on the sashes for the patchwork of the crosses quilt. I took a blue pen to outline the 2 additional pieces I need to create. This typically has 7 blocks across by 8 down so 56 blocks, and for each of those I’ll need to create 2 of the pieces in the left side of this photo that consists of 6 elongated hexagons and 4 1″ squares. In other words, I need 112 of those. Then the one on the right is what I call the cornerstone; it probably has another name but that’s what I’m calling it. That one consists of 12 elongated hexagons, then 8 of the same color in the sashes, and then 4 in the middle that comes from fabric used in the blocks I’ve made. The picture below shows where I’ve made 2 sashes and how they’ll be joined together. I wanted to keep the fabrics in this part as a solid that was also neutral so that the blocks are the star of the show. The lighter fabric is Bella Solids – Porcelain, and the darker fabric in the 1″ squares is Bella Solids – Etchings Charcoal. It looks pretty close to a dark olive to me and not so much grey like I had in mind but it’s still a good neutral color that should work out fine.
I think I’ll take a break from making blocks and catch up on some of this so that I can start to see it take shape. That’s the fun part!
If anyone is interested in making this quilt, it’s actually pretty easy since there are only 2 shapes in it. And it doesn’t have to be fussy cut like this to make a statement. It could work very well with high contrast non-directional and/or. The elongated hexagons can easily be cut out of either mini charm packs (2.5″ pre-cuts), or 4 pieces out of a charm pack (5″ pre-cuts).
That king size quilt is stunning. I’d love to know the name of that pattern! I just started quilting about 6 months ago and I just can’t get enough! Your work is amazing!
Thank you! That quilt pattern is known as a disappearing 4 patch. . For the disappearing 4-patch, you simply sew 2 blocks across and 2 down. So if you had 3″ squares, the block would end up 6×6 (finished). Then you make 3 even cuts both vertically and horizontally and they are rearranged to end up with this pattern. I should probably write a full post to explain it, but in the meantime, I’m sure googling disappearing 4-patch quilt pattern will get you to a tutorial. It’s easy, fast, and a lot of fun!
This is SO awesome! I am intimidated by this kind of quilting but I think they always look so amazing and yours is no exception!
Thank you! I’m no great quilter – if I can do it, anyone can!
They all look fantastic. I am dumb struck by the level of your productivity!
Thank you! I work from home, so that’s a huge advantage. I can sew in the morning before work, or during my lunch hour, or 5 minutes after work is over, etc. I’m very fortunate to have the flexibility in my schedule.
The Bloom Quilt is beautiful.
Thank you!
Good heavens, you’re productive! Everything looks so good but I am especially impressed with the fussy cutting in the last quilt–can’t imagine doing it but I like seeing you do it!
Thank you! I think that’s my favorite part of making the blocks – unlocking the puzzle as to what layout will really add the most interest. I probably never would’ve hand sewn 5 years ago but I’m enjoying it right now.
Beautiful work on all of the quilts- truly inspiring! 😊
Thank you so much!